
Welcome back to our ongoing series on Kubernetes! In previous posts, we’ve explored the basics of virtualization and Kubernetes. Now, it’s time to get practical and hands-on with deploying Pods on Kubernetes. In this post, we’ll be taking a step-by-step approach to show you how to deploy your first Pod on Kubernetes. So, get ready to roll up your sleeves!
Before we get started with the demo, it’s important to note that for trying out this demo on your own, you’ll need access to a Kubernetes cluster and kubectl. If you don’t already have access to a cluster, you can deploy your own small test cluster using tools like Rancher Desktop or Minikube.
If you are completely new to this, we recommend installing Rancher Desktop since it includes a preconfigured Kubernetes cluster, along with kubectl and other tools, so you can get started with Kubernetes development right away.
Pods
In Kubernetes, a Pod is the smallest deployable unit that can be created and managed. A Pod is a logical host for one or more containers, and it provides a shared namespace and network for the containers within it. For example, a Pod might contain two containers that work together to serve a web application: one container that runs the web server software, and another container that runs a database. Because the containers in a Pod share the same network and can communicate with each other using localhost, they can work together seamlessly to provide a cohesive application.
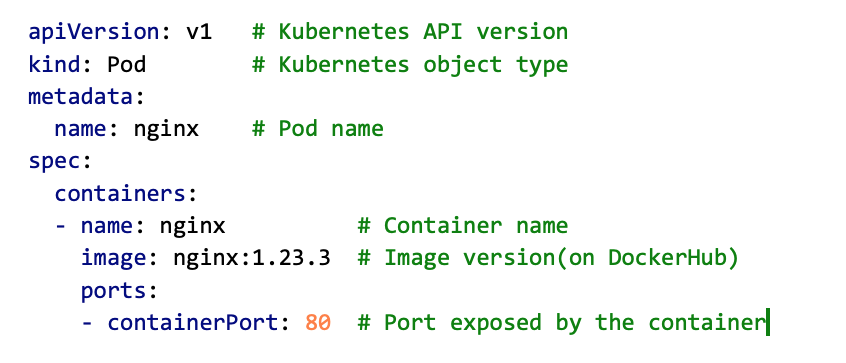
So, time to make a new Pod! We will make a very simple Pod named “nginx” with just one container based on the nginx container image, which will serve a basic landing page on port 80. We will use a YAML file to define our Pod configuration:
YAML files provide a human-readable way to define complex configurations, and they can be version controlled and shared easily among team members. By defining our desired state in YAML files, we can automate the deployment and scaling of our applications in Kubernetes.
Pod Specification
First time seeing a Kubernetes YAML file? Don’t worry! 😊 Here is a brief explanation of its contents. Each YAML config file consists of two main parts: general information and the specification of the desired state of the object we are creating.

In the general part, the kind property specifies the type of object that will be created, which is in our case – a Pod. We must also specify the name of the object in the metadata section, and optionally we can additional information such as labels and annotations.
The spec section of the YAML contains information for creating the object. Here we will specify a list of containers that will run inside the Pod. For the container, we must specify the name and image that will be used for creating the container. In this case, we are going to use a DockerHub image of nginx, version 1.23.3. Finally, since this is a web app, we need to specify a port that should be exposed by the container (the containerPort specified in the Pod specification and the port exposed by the container should match).
By default, Kubernetes assumes that the container images are stored in Docker Hub. To use container registries other than Docker Hub, the full image path must be specified, including the registry name.
Deploying a Pod
Now, let’s put it all into action! Open your favorite terminal and create a Pod using the kubectl apply command (remember that one! you will be using it a lot 😉). The –f flag indicates that we are using a YAML file for the config.
kubectl apply -f nginx_pod.yaml
Checkout the Pod status using the kubectl get command.
kubectl get pods
If you ever forget a kubectl command or need a quick reference, there is a helpful cheat sheet on the Kubernetes website: https://kubernetes.io/docs/reference/kubectl/cheatsheet.
Once you have your shiny new Pod up and running, it’s time to see if it’s doing the job. But how do you access a Pod inside a cluster? Well, since you have exposed port 80 in the container configuration, it means a corresponding endpoint on the Pod has been created (i.e., a port with the same number is opened on the Pod). The Pod’s IP address and the container port together form the endpoint address. This endpoint can then be used to access the container’s service from within the Pod, as well as from other Pods in the same cluster if the Pod is part of a service.
Okay, what is the Pod’s IP address? The Pods are always assigned a local IP address that is reachable only from within the cluster (isolated from the network in which your PC is). Thus, to access the Pod you will need to do a port-forward.
kubectl port-forward nginx 8080:80

When you use port forwarding to access a Pod running inside a Kubernetes cluster, the Kubernetes API server creates a secure tunnel between your PC and the Pod. The traffic is then forwarded through this tunnel to the appropriate Pod. The API server communicates with the kube-proxy on the node where the Pod is running to route the traffic to the appropriate Pod.
Now, open your favorite web browser and go to htttp://localhost:8080. You should see the nginx landing page.

If you see something like the screenshot above, congratulations! You’ve taken your first step into a larger world. 😊
Debugging a Pod
Sometimes everything works out nicely, but there are those times when something goes wrong, and… the Pod crashes! ☹ So, how can you find out what went wrong?
Usually, debug or error messages are written to the standard output. Let’s see an example how to view messages written to Pod’s standard output. To do this, we are going to deploy a new Pod that writes a short message to standard output. Here is the YAML:

Notice that in this example we have added a new property to the spec section – command. This command runs a shell command in the container when it is started.
Now, when we deploy this Pod, we can check out the output using the kubectl logs command.
kubectl apply -f busybox_pod.yaml
kubectl logs busybox
This Pod outputs a “The app is running!” message every ten seconds, so after a while, you should see this message written several times.

Another way to inspect a Pod is by connecting directly to the container running inside the Pod using the kubectl exec command. It will start a shell inside the busybox Pod’s container, allowing the user to interact with the container’s environment.
kubectl exec -it busybox — /bin/sh
Since this is a Linux-based container, you can use standard Linux commands to explore the contents of the container.

Deleting a Pod
If you don’t need the Pod any more, you can easily delete it with kubectl delete command followed by the name of the YAML file used to create the Pod (just make sure you are positioned in the folder where the YAML files is). In this example, we can delete the busybox Pod with this command:
kubectl delete -f busybox_pod.yaml
This will send a request to the Kubernetes API server to delete the Pod, and the Pod will be terminated shortly after. Keep in mind that deleting a Pod will remove it permanently, so be sure to double-check before proceeding.
Next time…
Thanks for hanging out with us as we explored deploying Pods in Kubernetes. We hope you found this post helpful in getting started with YAML files and kubectl commands. In our next post, we’ll level up and explore how to deploy multiple replicas of the same Pod and make them available via Services. So, keep an eye out for that one! As always, feel free to give us a shout if you have any questions or just want to say hi. Cheers!