
Welcome back! In our previous blog, we discussed the basics of pods in Kubernetes. Today, we’ll take the next step and learn how to deploy multiple replicas of the same Pod using the Deployment component. Additionally, we’ll explore how to make these replicas accessible through a Service component, allowing for seamless scaling and load balancing. By the end of this blog, you’ll have a solid understanding of how to deploy and maintain multiple replicas of the same Pod in Kubernetes. So, let’s get started!
Deployments
If you’re relying on a single Pod to run your application, you could be putting it at risk of downtime (e.g., a Pod crashes or your app is so popular that a single app instance cannot handle the demand 😊). The only way to avoid this problem is to have multiple instances (replicas) of your application up at the same time. However, managing these replicas manually is tedious and time-consuming. Fortunately, Kubernetes offers an elegant solution – the Deployment component.
In Kubernetes, a Deployment is a high-level resource object that isused to maintain a desired number of replicas of a Pod template, which is a blueprint for creating new Pods. Basically, you define the desired state of the application and the number of replicas that should be running, and Kubernetes will automatically handle the process of creating these replicas. Also, in case a Pod crashes, it will be automatically replaced with a new one.

Let’s now look at how to create a Deployment. We will again use a YAML file to specify our Deployment. Here is a simple example that will create two replicas of the “nginx” Pod (the one we deployed in the previous blog):

You probably recognize some parts of this YAML file, like kind and name properties in the general section, and the container specification at the end of the file. But there are also some new parts which we will now explain. In the general part of the file, you might notice a new property in the metadata section – the labels. This property contains key-value pairs (e.g., app: nginx). The same label is also in the Pod template section of the Deployment, which means that the Pods created by the Deployment will also have this label. So, what is the purpose of these labels? To put it simply, Kubernetes will use these labels to track the Pods that belong to this Deployment.
Labels are a powerful feature in Kubernetes that can help you organize, manage, and monitor your resources more effectively. They provide a simple yet expressive way to group related resources, filter resources based on shared characteristics, and target specific resources for operations like scaling and updating.
Compared to Pods, the spec section of the YAML is a bit more complex. It now contains three main parts:
- replicas – the number of Pod replicas that need to be running at any time,
- selector – specifies the selector (i.e., list of labels) used to identify the set of Pods managed by the Deployment,
- template – contains the specification of the Pod template, which is in this case a container specification and a list of labels used for tracking the Pods.

Alright, we are ready to deploy! We will use the kubectl apply command again:
kubectl apply -f nginx-deployment.yaml
You can now check out the status of deployment using the kubectl get command. Use the ‘all’ argument to see both the deployments and pods that are created:
kubectl get allIf everything went okay, you should see something like the output in the figure below. If your PC is a bit slow, it might take some time to create Pods (usually not longer than a minute), and in that case, you will see “0/1” in the READY column, and “ContainerCreating” STATUS.

Notice that now you can see both the Deployment and the list of Pods that are created. If you look carefully, you will see that Pods have some random numbers and letters added after the name you gave them in the spec. Those are added by Kubernetes automatically when multiple Pods are created from a template. Finally, notice something called replicaset. In short, ReplicaSet is a resource object created by the Deployment and used to manage a set of replicated Pods.
If you need to scale your application up or down in Kubernetes, Deployments make it easy. Simply update the specification with the desired number of replicas, run the kubectl apply command, and voila! The Deployment will automatically create or terminate Pods to match the desired state. You can monitor this process in real-time using the kubectl get command with the — watch flag. If you run this command quickly enough, you may even be able to observe the old Pods being terminated and new ones being created.
If you delete a Pod that was created by a Deployment (using the kubectl delete command), the Kubernetes will immediately create a new Pod to maintain the desired state. To permanently remove all Pods and prevent creating new ones, you will need to either delete the Deployment or set the number of replicas to 0.
Deployments are also useful for rolling out updates to your application. All you need to do is update the container specification in your YAML file and run the kubectl apply command. The Kubernetes will then gradually update the replicas of your application with a new version of the container image or configuration. This ensures that your application is always available during the update process, reducing the risk of downtime.
To summarize, here are a few use cases when you should opt for Deployments:
- High availability and scalability: maintain multiple replicas of an application.
- Simplified update rollout: reduce the risk of downtime while performing application updates.
- Fault tolerance: define a strategy for how your application should behave in the event of a failure, such as specifying the number of replicas to maintain, and the number of Pods required before scaling up or down.
- Load Balancing: deployments work with Kubernetes Services to distribute user requests across the replicas of your application.
Using Services to communicate with Pods
Now that your Pods are up and running, you may be wondering how to connect to a specific one. Each Pod is assigned a dynamic IP address when it’s created, but this can change if the Pod crashes or restarts. So, how do you keep track of those IPs and allow other components in the system to access them?
Additionally, if you have multiple Pods running the same app, how do you distribute incoming queries among them? This is where the Service component comes in. By using Services in combination with Deployments, you can load balance user requests and ensure that each query is passed to the appropriate Pod.Service is an abstraction layer that defines a logical set of Pods and enables network communication between them and other services or external clients. Services provide a stable endpoint for other parts of your application to access the Pods they need, regardless of which nodes they are running on. Services can be exposed internally within the cluster, or externally to the internet.

A Service is defined using a Kubernetes manifest file, which specifies the name of the Service, the type of Service (ClusterIP, NodePort, LoadBalancer, or ExternalName), the port(s) it should expose, and the selector that determines which Pods are included in the Service. To define a Service for our nginx Deployment, we will use a YAML file again:
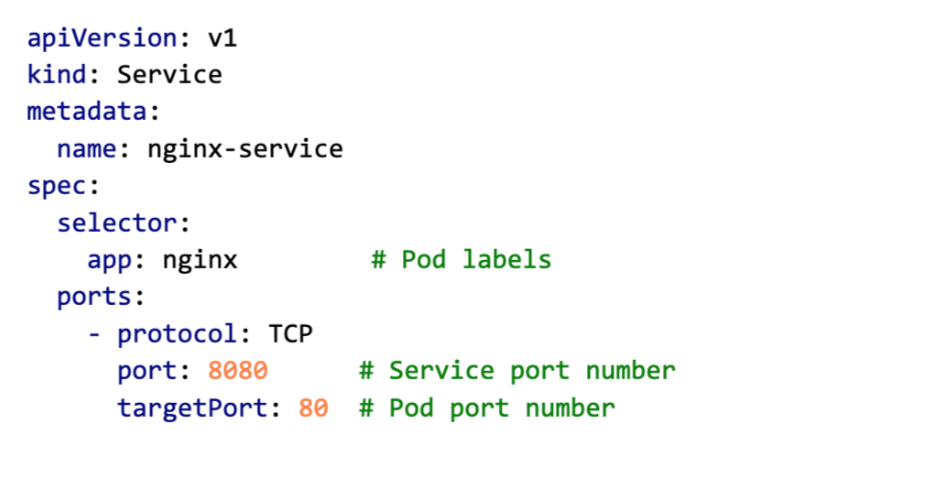
Notice the selector property used for connecting to the corresponding Pods, and also notice that in the ports section, there are two ports defined: port and targetPort. The first one specifies the port number on which the Service is listening, and the second one is the port number on Pods to which all requests (traffic) are forwarded to.

In this example, we have not defined the type of Service, so the ClusterIP type, which is the default one, will be used. ClusterIP is a type of service in Kubernetes that exposes the service on a cluster-internal IP address. This type of service is only accessible within the cluster and is not exposed to the outside world. We will discuss all Service types in the upcoming posts.
Okay, let’s create a Service and check out the status using the kubectl get command with the argument ‘svc‘:
kubectl apply -f nginx-service.yaml
kubectl get svc
If everything went okay, you should see something like the output in the figure below.

Now you can access your nginx server by port-forwarding the ngnix-service endpoint. Open your favorite web browser and go to htttp://localhost:8080. You should see the nginx landing page.
kubectl port-forward svc/nginx-service 8080:8080
Multiple YAML specs in one file
In Kubernetes, it is possible to define multiple resources in a single YAML file, with each resource separated by three hyphens (—). This can be useful for managing related resources together or for applying a group of resources at once. Here is an example of how to put the Deployment and Service specs for our nginx app in a single YAML file.
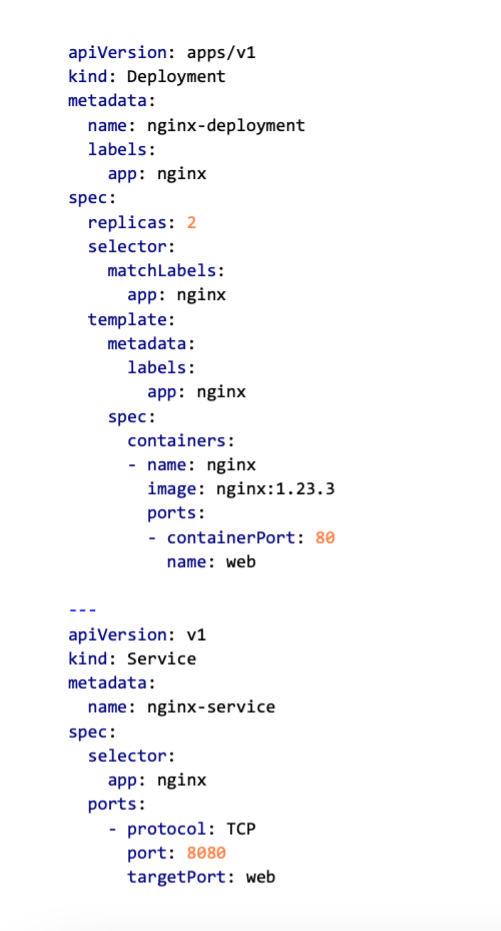
Now, if you named your file nginx_all.yaml, you can deploy all with a single kubectl apply command:
kubectl apply -f nginx_all.yaml

Also, when it comes to the port specification, you can specify names for ports exposed on the Pods, so when you define a Service, in the targetPort property, you can specify the port name instead of the port number.

Deleting Deployments and Services
To delete a Deployment or a service in Kubernetes, you can use the kubectl delete command followed by the resource type and name of the object you want to delete. In this example you can use:
kubectl delete deployment nginx-deployment
kubectl delete service nginx-service
You can also specify the file name which you used for creating the Deployment or service, for example:
kubectl delete -f nginx-deployment.yaml
kubectl delete -f nginx-service.yaml
In case you defined both in a single file, you can reference that file and it will delete both components:
kubectl delete -f nginx_all.yaml
Next time…
That is all for today! Thank you for your time! We hope we were able to give you a basic idea of how Deployment and Services components work. These components play a critical role in the Kubernetes ecosystem, allowing applications to be designed as microservices and easily scaled and updated. Next time we will go more in-depth about the Service component and talk about different service types and service discovery in Kubernetes.