
Hello and welcome back to our blog! Today we continue to dive into the fascinating world of Kubernetes. In our previous post, we demystified the essentials of Kubernetes Deployments and gave you a glimpse into the powerful capabilities of Kubernetes Services, providing you with a solid foundation to build upon.
In short, Kubernetes Services are a fundamental component within the Kubernetes platform, which enable stable and discoverable network communication between Pods (i.e., various), ensuring seamless connectivity and load balancing within your distributed applications. There are four types of Services in Kubernetes: ClusterIP, NodePort, LoadBalancer, and ExternalName. Today, we’ll take a closer look at each one, and explain practical use cases.
ClusterIP
The default service type, and the one that you will probably use most often, is ClusterIP. It provides a stable IP address within the cluster for internal communication, i.e., it is only accessible within the cluster and is not exposed to the outside world. As we saw an example in our previous blog, where we created an nginx-service for accessing nginx pods, using a Service provides a stable endpoint (an IP address and a port) which other pods and services within the cluster can connect to. Additionally, using a Service provides load balancing, which means that if we have multiple Pods running the same app, it will distribute user requests to Pods in a balanced manner.

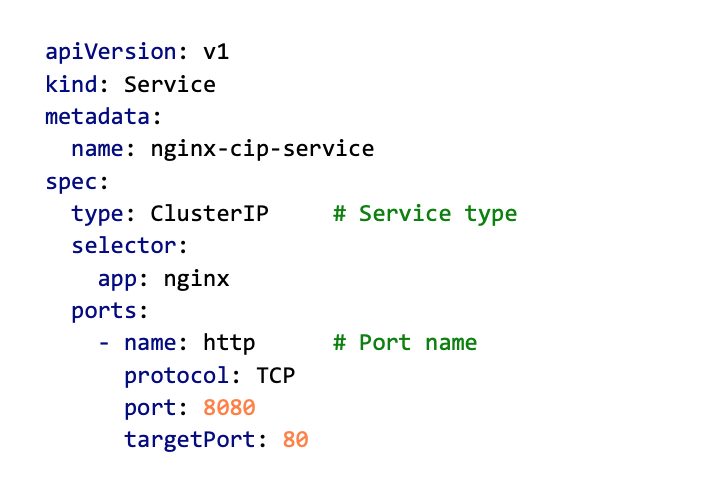
Here is an example YAML file for creating a ClusterIP type of Service. Notice the property type where we specify the Service type. If it is omitted, Kubernetes will create a ClusterIP type, as it is the default type of Service. As you have already seen in the previous blog, ports can have names, which is particularly useful if a Service has more than one port defined.
Now, let’s create that Service and see what happens. Again, we will use the kubectl apply command.
kubectl apply -f nginx_ClusterIP.yaml
This will create a ClusterIP Service nginx-cip-service and assign a cluster-local IP address to it. Check it out with the kubectl get command and notice the IP address assigned to it. If any other Container, Pod, or Service within the cluster wants to access that service, that is the IP address they will need to use.
kubectl get svc

Accessing Services
Before we move on to other Service types, let’s take a quick look at different ways of accessing those Services.
All Services will get a stable Cluster-IP address, as we have just seen. So, using that address in combination with the port number (in this case: 10.43.246.89:8080) will do the trick. However, that is not very convenient because the IP numbers are chosen randomly, and if we delete and redeploy a Service, it will change.
Another way to access a Service is by using its name as a DNS record. When a service is created, a DNS record is created for it in the cluster’s DNS server. The name of the DNS record is the name of the service with a suffix that depends on the namespace the service is in. For example, if you have a service named nginx-cip-service in the default namespace, the DNS name of the service would be nginx-cip-service.default.svc.cluster.local. Since the Service name never changes, this is a preferred way of accessing Services.
Kubernetes has a built-in DNS service called kube-dns or CoreDNS (depending on the version and configuration). This DNS service provides DNS resolution for Kubernetes Services and their IP addresses within the cluster. The DNS server is automatically configured in Pods’ /etc/resolv.conf files, so that applications running inside the cluster can discover and communicate with Services using their Service names.
Lastly, if you remember, in our previous blog we created a Cluster IP Service for our nginx Deployment, but we were also able to access it from our PC, which is outside the cluster. Although having Services reachable only from within the cluster is good for improving security (if you cannot see it, you cannot break it 😉), sometimes we will still need to access it from outside (e.g., during development stages, or for debugging). To do that, you can simply use kubectl port-forward feature, as we did last time, and the Service will become available on localhost.
kubectl port-forward svc/nginx-cip-service 8080:8080

NodePort
Another type of Service is NodePort. It is very similar to ClusterIP and will work the same from within the cluster, but NodePort also exposes the service to the outside world by opening a static port on each node in the cluster. This allows external access to the service by specifying any of the nodes’ IP addresses along with the opened port number.
To clarify, a NodePort Service still gets a local IP address from the cluster’s IP range which is used for intra-cluster communication between services. It also does load balancing in the same way as ClusterIP. The main difference is that NodePort will enable external access to the Service (i.e., from a browser or a client outside of the cluster), which can be useful for debugging and testing.
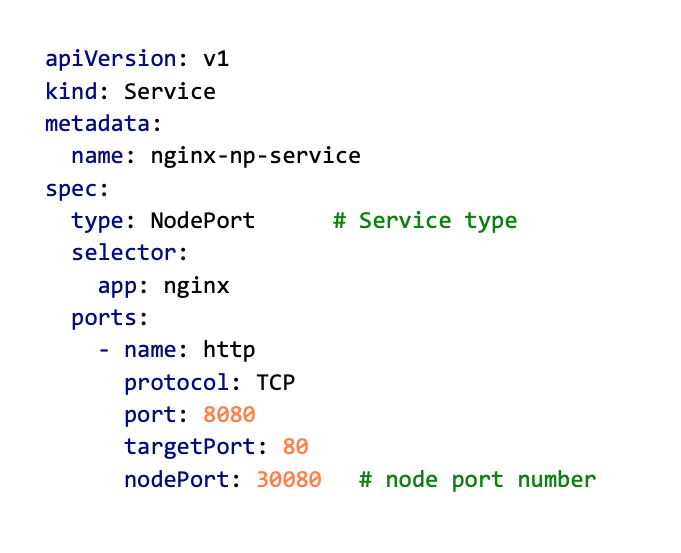
Below is an example YAML for creating a NodePort service. You can notice that the value of the type property has changed to NodePort and that there is a new property in the ports section – nodePort. This new property defines the port that will be opened on each node. Node ports can be chosen from the range 30000-32767.
We can now use the kubectl apply command to create a NodePort service (if you already have ClusterIP running on port 8080, either delete it or change the port number).
kubectl apply -f nginx_NodePort.yamlIf you look at the created Service using the kubectl get svc command, you should see a new nginx-np-service created, with an IP address and two ports (port and nodePort).

If you have multiple nodes in a cluster, NodePort will open the same port on all nodes in the cluster. This means that you can use any node’s IP and NodePort number to access a NodePort service, and all incoming traffic to any of the nodes on that port will be forwarded to the pods that the service is targeting, regardless of which node the pods are actually running on. In the two illustrations below you can see what happens if you have, for example, a cluster with 2 nodes (assume the IP address of the first node is 5.5.5.1 and for the second 5.5.5.2). If you create a NodePort Service with nodePort 30080, you can access it from outside the cluster using either node’s IP address.


From within the cluster, a NodePort is still accessible on its service port (which is 8080 in this case) and will forward requests to a Pod on targetPort (which is 80 in this case).
LoadBalancer
While NodePort is mainly used for development and testing purposes, another type of Service is used in a production environment to expose an application running in a cluster to the internet – LoadBalancer. A typical use case would be running a web server that needs to be accessible from the internet.
When a LoadBalancer service is created, the cloud provider creates a load balancer and assigns it a public IP address. Traffic coming to that IP address will be forwarded to the LoadBalancer service (the one you created), which will distribute the traffic among the pods in the deployment using a load-balancing algorithm.
The load balancer managed by the cloud provider is a virtual load balancer and is used to balance traffic across multiple nodes or instances in a cluster. The cloud provider’s load balancer also manages health checks and other advanced features such as SSL termination, session persistence, and more. If you are building your own cloud, you would need to provide either a physical load balancer or use a software-based load balancer, such as NGINX or HAProxy.

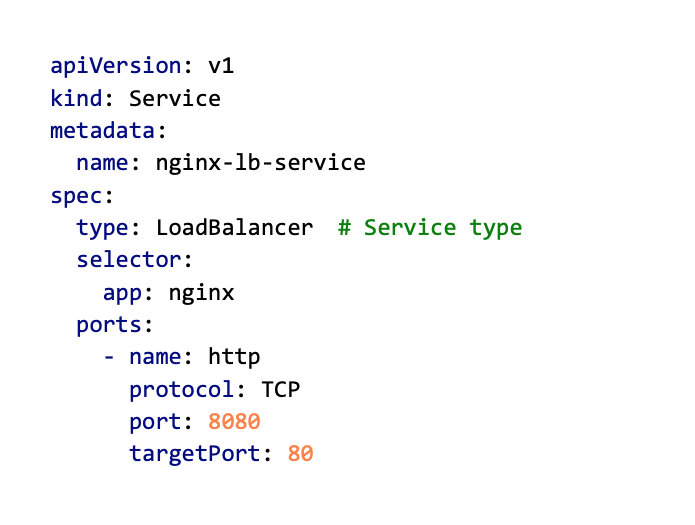
And here is an example YAML for creating a LoadBalancer service. It looks quite similar to NodePort spec, except that value of the type property has changed to LoadBalancer, and you do not need to specify a node port value.
Okay, let’s create our nginx LoadBalancer, and see what happens.
kubectl apply -f nginx_LoadBalancer.yaml
kubectl get svc

Now, you may notice that our new nginx-lb-service has got two IP addresses: a cluster-local and an external one. Also, you can see that, even though we didn’t explicitly specify a node port, the Service still got one assigned. This is because the LoadBalancer service type is built on top of the NodePort service, which means it automatically opens a NodePort as part of its operation. In our case, the LoadBalancer service opened two ports: 8080 (service port) and 31373 (nodePort). The service port (8080) is used for communication within the cluster, while the NodePort (30625) is used for communication between the external load balancer and the backend Pods through the nodes. To access this service from outside the cluster, you need to use the external IP address and either of the ports.Alright, these are the basics of a LoadBalancer Service. However, configuring the inner workings of load balancing in a real production setup requires tweaking additional parameters supported by this Service type. We will cover this another time, but if you are interested, check out official Kubernetes docs: https://kubernetes.io/docs/tasks/access-application-cluster/create-external-load-balancer/.
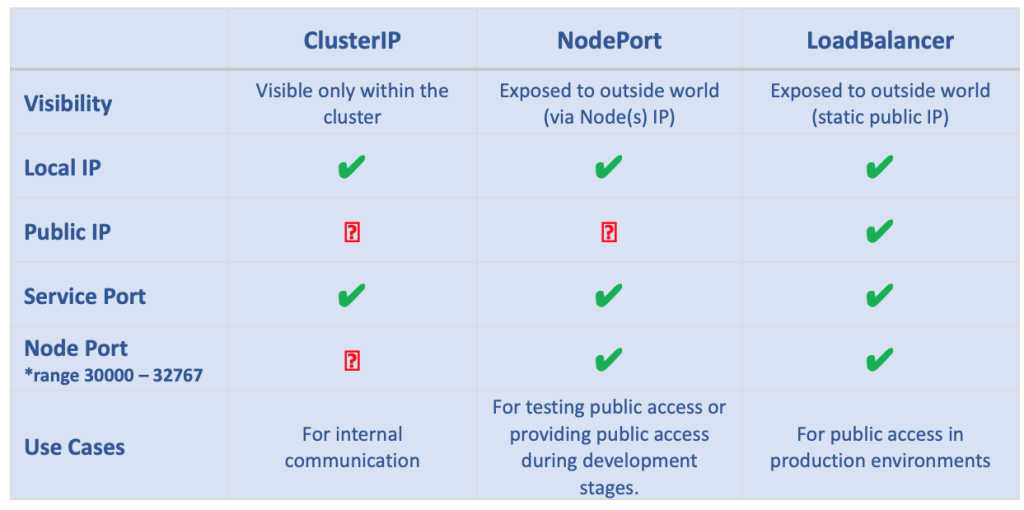
Service type comparison
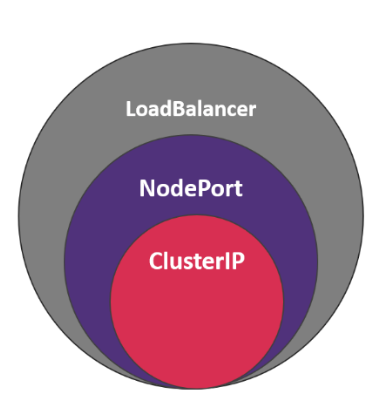
If you have read everything carefully, you have probably noticed that each new Service type we described had all the properties of the one before it and added some of its own. In short, we can say that NodePort is an extension of ClusterIP, and LoadBalancer is an extension of a NodePort. All of them provide load-balancing functionality but differ in how they expose the Service to the outside world. Here is a table summarizing all the main properties of each Service type.
ExternalName
So, one last Service type to cover – the ExternalName. This one is a bit different from the previous ones. Let’s see how.
ExternalName Service maps a service to a DNS name in an external DNS server. This service type is used when you want to create a service that doesn’t actually have any endpoints but only maps to a DNS name. Essentially, it’s a way to create a service that acts as an alias for a DNS name. It is useful when you want to give a service a more meaningful name or when you need to access a service outside the cluster.
For example, let’s say you have a microservice architecture, and one of your microservices is implemented in a non-Kubernetes environment, but it is accessible through a DNS name like my-microservice.example.com. You can create an ExternalName service in your Kubernetes cluster that maps to this DNS name so that any other Kubernetes services that need to access this microservice can use the ExternalName service as if it were a regular service in the cluster.

Below is an example YAML. In this example, any pods in the same namespace as this service can access the external microservice using the DNS name my-microservice. Note that externalName is a required field, and it must be a valid DNS name. ExternalName accepts an IPv4 address string, but as a DNS name comprised of digits, not as an IP address.

Next time…
That’s all folks! 😊 We hope this detailed overview of the different types of Kubernetes services has provided you with a solid understanding of their roles and how they contribute to efficient container orchestration.
Our exploration of Kubernetes continues in our upcoming blog posts, where we’ll focus on persistence in Kubernetes. We’ll cover key concepts such as Persistent Volumes, Persistent Volume Claims, Storage Classes, and StatefulSets to help you manage and maintain data consistency in your containerized applications. Stay tuned for more informative content, and until then, happy learning!